Smart Traffic Light 1: Setting Up an IoT System
Setting up an IoT network for a smart traffic light.
Introduction
Welcome to the first installment of our smart traffic light series! In this post, we’ll explore how to create a simple IoT network for a traffic light system. We’ll cover the basics of setting up the network, and in future posts, we’ll dive into building a proof of concept and a full-size version of our smart traffic light.
Background: The Rowing Ban System
As a member of the Webcie at A.U.S.R. Orca, a student rowing club, I’ve been involved in developing and maintaining the club’s websites. One of our key projects is the Member Portal1, which includes a feature for administrators to broadcast rowing bans. These bans indicate whether it’s safe or permitted to row, based on factors like weather conditions or scheduled events.
The rowing ban status can be represented by a traffic light system:
- 🟢 Green: No rowing ban
- 🟠 Orange: Partial rowing ban (e.g., only single sculls allowed)
- 🔴 Red: Full rowing ban (no rowing allowed)
Our goal is to create a physical traffic light that automatically displays the current rowing ban status. This tangible representation will serve as an eye-catching and practical addition to the club’s information system.
Building the IoT Network
To bring our smart traffic light to life, we need a robust infrastructure that enables communication between devices. We’ll use the MQTT (Message Queuing Telemetry Transport) protocol, which is ideal for IoT applications due to its lightweight nature and publish-subscribe model.
Understanding MQTT
MQTT revolves around a central server called a broker, which manages communication between connected devices (clients). Here’s a simplified overview of our network:
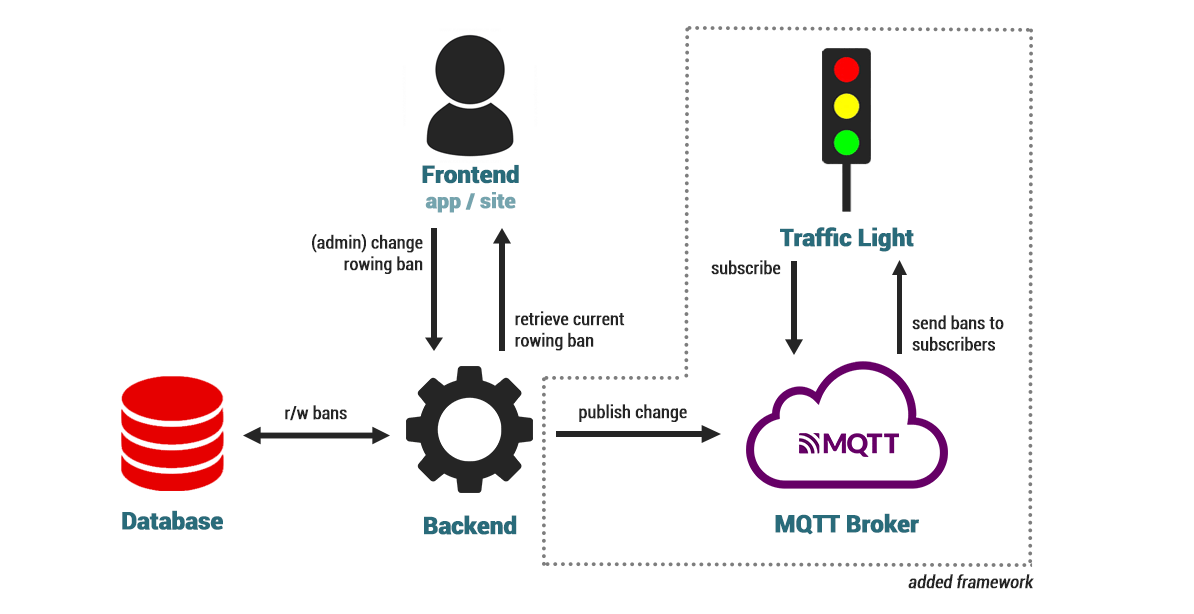
Backend, Database and Frontend are all components of the previously mentioned member portal. The user (admin) activates a certain rowing ban by pushing a button on the frontend. This triggers an action on the backend, adding the new ban to the database. The frontend now displays the new ban that is stored in the database. These components are specific to the Orca use case and could be replaced by any other system.
Both Traffic Light (our device) and Backend (of the member portal) are clients connected to the broker.
MQTT uses topics to organize information. Clients publish messages to specific topics and subscribe to topics they want to receive messages from. For example:
- Publishing topic:
bans/status - Subscription topic:
bans/#(using a wildcard to receive all messages under the “bans” topic)
An important feature of MQTT is the option of retained messages. The broker can save the last message sent to a topic, ensuring new clients receive the most recent information upon connecting. This is crucial for rowing bans; otherwise the device would only be able to detect the rowing ban the moment it changes.
Setting Up the Broker
In the past I’ve been using CloudMQTT for experimenting, but they recently shut down their free plans (cheapest plan is now $5 per month). MyQttHub, HiveMQ and Flespi look promising, although I’ve never used any of them.
For our project, we’ll use Mosquitto, a popular open-source MQTT broker. While there are cloud-based options available, setting up your own broker provides more control and is cheaper in the long run. Setting up your own broker is fairly easy to do, but it requires some configuration and of course your own server. You can find a tutorial on how to do so using Docker here.
Implementing Access Control
To secure our system, we’ll create three user accounts with specific permissions:
- webmaster: Admin account with full access2
- ledenportaal: Account for the Member Portal
- orca: Account for client devices (e.g., the traffic light)
We’ll use an Access Control List (ACL) to restrict these accounts. Here’s a sample ACL configuration:
# Admin account
user webmaster
topic readwrite #

# Member Portal account
user ledenportaal
topic readwrite vvb/status

# Client devices account
user orca
topic read vvb/status
topic write connection/#
This blogpost explains ACL for Mosquitto more thoroughly.
Publishing the Rowing Ban Status
To integrate the rowing ban system with our MQTT network, we used the MQTTnet library in our ASP.NET Core backend. This allows us to publish updates to the broker whenever the rowing ban status changes.
Remember, you could take anything as input for your traffic light! For example, it can display the current rowing ban of your own sports club, kanikeenkortebroekaan.nl, or just have fun toggling it manually.
Conclusion and Next Steps
We’ve now laid the groundwork for our smart traffic light system by setting up an IoT network using MQTT. To recap, we’ve covered:
- The concept of using a traffic light to display rowing ban status;
- MQTT basics and network architecture;
- Setting up an MQTT broker;
- Implementing access control for security;
- Publishing rowing ban updates to the network.
In our next post, we’ll build a prototype of the traffic light, bringing our IoT concept to life. Stay tuned!
-
The member portal (“Ledenportaal”), located at mijn.orcaroeien.nl, is a private website for members of the club. It’s used for boat reservations, articles et cetera. ↩
-
With software like MQTT Explorer it’s really easy to send test messages and have an overview of the traffic that goes through your broker ↩